Introduction
Running into an APT-GET update error can be frustrating when you’re trying to maintain your Linux system. Whether you’re using Ubuntu, Debian, or any Debian-based distribution, package manager errors can halt your workflow and prevent you from installing or updating critical software.
This comprehensive guide walks you through three proven methods to resolve APT-GET update errors, with clear explanations of what each command does and why it works. These solutions have been tested extensively and work on most modern Linux distributions.
Understanding APT-GET Update Errors
Before diving into solutions, it’s important to understand what causes these errors. APT (Advanced Package Tool) maintains a local cache of package information and downloads packages from remote repositories. Errors typically occur due to:
- Corrupted cache files – Damaged or incomplete package data stored locally
- Broken dependencies – Packages with unmet or conflicting requirements
- Interrupted updates – Previous update processes that didn’t complete properly
- Repository issues – Problems with remote package sources or mirrors
- Disk space problems – Insufficient storage for package operations
The good news is that most of these issues can be resolved with a few strategic commands that clean and repair your package management system.
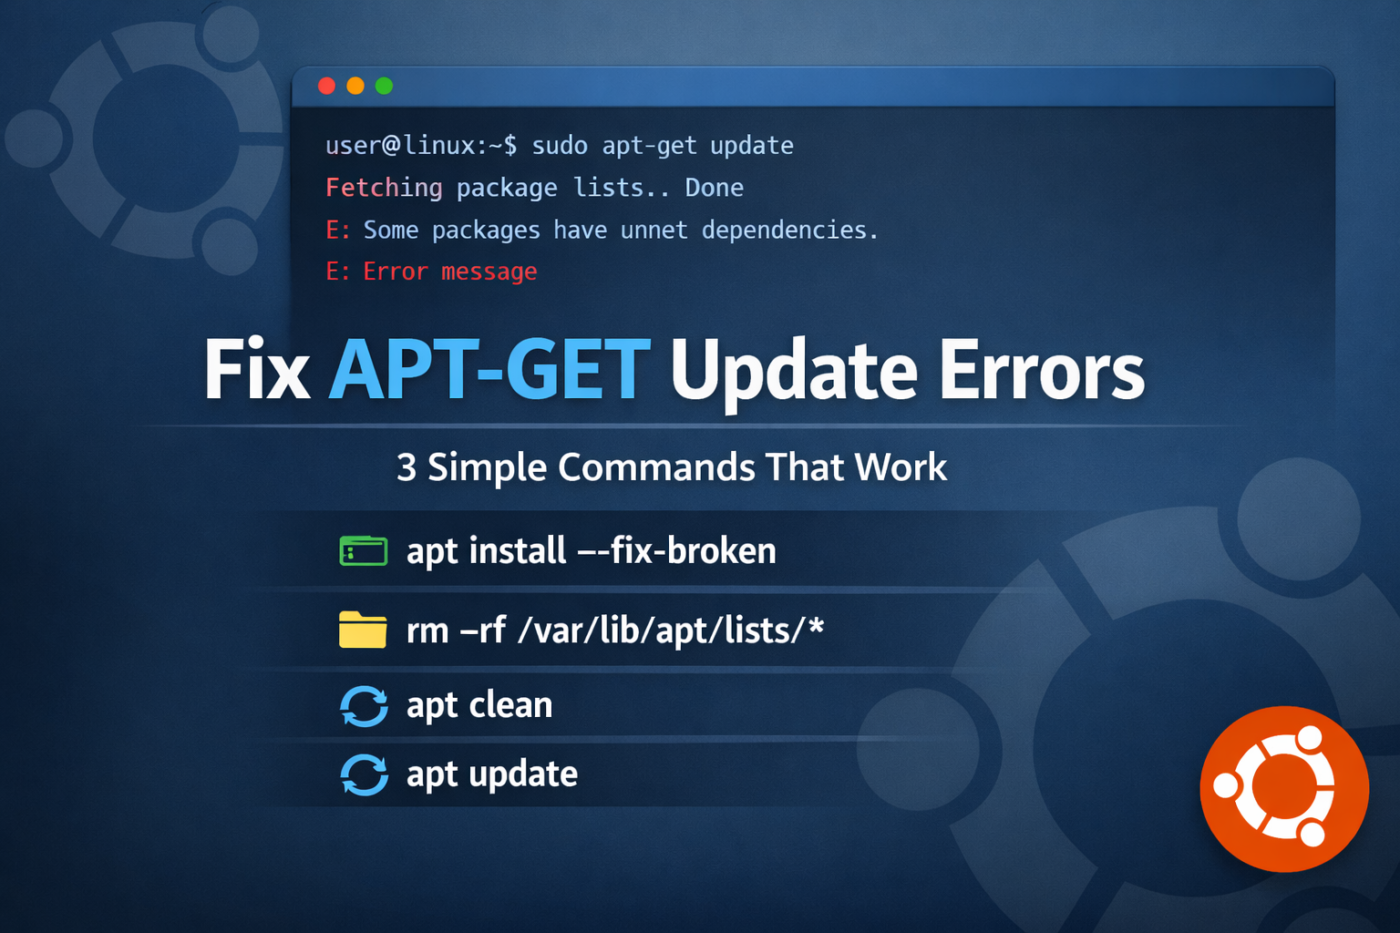
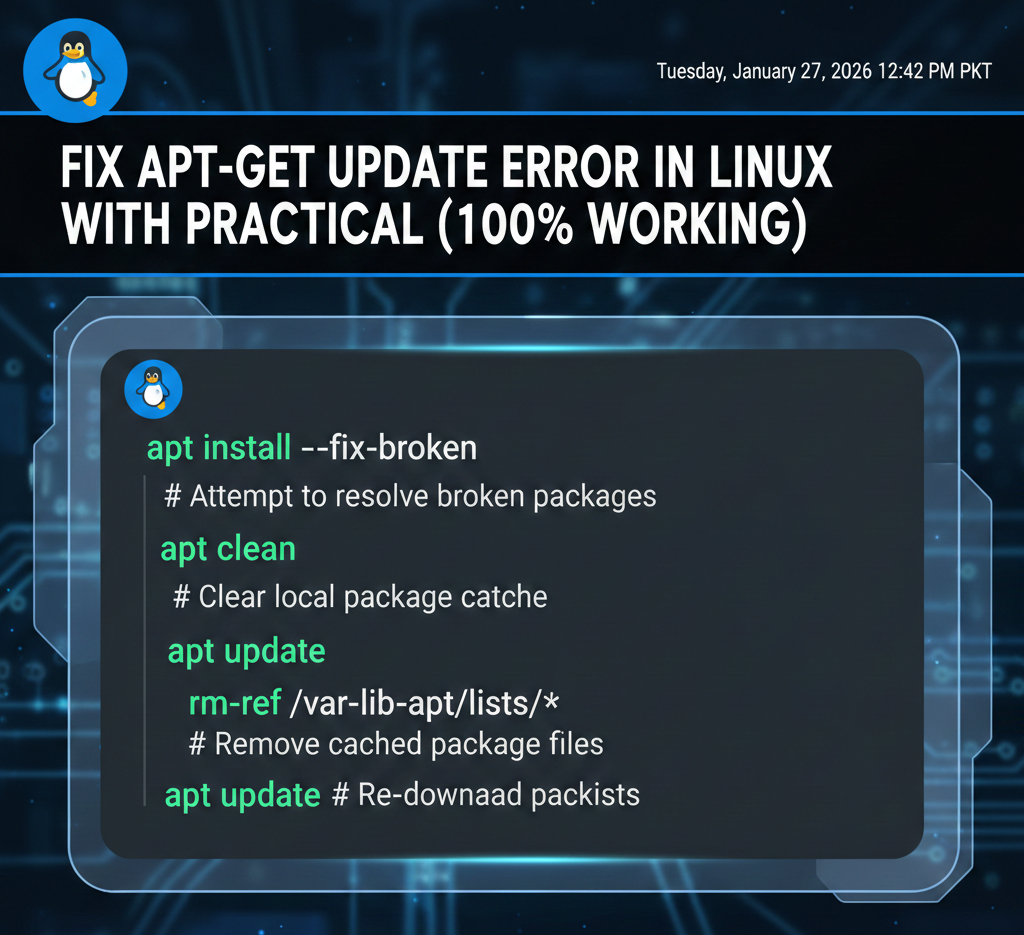
Solution 1: Fix Broken Package Dependencies
The Command
bash
sudo apt install --fix-brokenWhat This Does
The --fix-broken flag (also written as -f) tells APT to attempt to correct a system with broken dependencies. This is often the first line of defense when encountering package-related errors.
When you run this command, APT will:
- Scan your system for packages with unmet dependencies
- Attempt to automatically install missing packages
- Remove or reconfigure packages that are causing conflicts
- Repair the package database to restore consistency
When to Use This Solution
Use this command when you see error messages like:
- “You have held broken packages”
- “Unmet dependencies”
- “Package X depends on Y, but it is not going to be installed”
- After a failed installation attempt
Step-by-Step Process
- Open your terminal (Ctrl+Alt+T on most distributions)
- Run the command with sudo privileges:
bash
sudo apt install --fix-broken- Read the output carefully – APT will show you what changes it plans to make
- Confirm the changes by typing ‘Y’ when prompted
- Wait for the process to complete
Important Notes
- This command may remove certain packages if they’re causing irreconcilable conflicts
- Always read what APT proposes to do before confirming
- Your data remains intact – only package installations are affected
- This won’t fix system configuration files, only package relationships
Solution 2: Clear APT Cache Data
The Command
bash
sudo apt cleanWhat This Does
The APT cache stores downloaded package files (.deb files) in /var/cache/apt/archives/. Over time, this cache can become corrupted or consume significant disk space. The apt clean command removes all downloaded package files from the cache directory.
Think of this as clearing your browser cache – you’re removing temporary files that can be re-downloaded if needed. This is a completely safe operation that won’t affect your installed packages or system configuration.
When to Use This Solution
Use this command when:
- You’re experiencing unexplained package manager errors
- Your system reports disk space issues
- Package downloads seem to be failing or incomplete
- You want to free up disk space (cache can grow to several gigabytes)
- After multiple failed update attempts
What Gets Removed
The command clears two main directories:
/var/cache/apt/archives/– Stored .deb package files/var/cache/apt/archives/partial/– Partially downloaded packages
Step-by-Step Process
- Open your terminal
- Execute the clean command:
bash
sudo apt clean- The command runs silently with no output (this is normal)
- Verify cache has been cleared (optional):
bash
du -sh /var/cache/apt/archives/- Proceed to run apt update:
bash
sudo apt updateBenefits of Regular Cache Cleaning
- Prevents cache corruption – Old cache files can cause mysterious errors
- Saves disk space – Free up gigabytes of storage
- Improves performance – Smaller cache means faster cache lookups
- Fresh downloads – Forces APT to download clean, uncorrupted files
Alternative: apt autoclean
If you want to remove only outdated packages from the cache (keeping current versions), use:
bash
sudo apt autocleanThis is a more conservative approach that preserves recently downloaded packages while still cleaning up obsolete ones.
Solution 3: Remove and Rebuild APT Lists (Advanced)
The Command
bash
sudo rm -rf /var/lib/apt/lists/*
sudo apt update
What This Does
This is the nuclear option for APT issues. The /var/lib/apt/lists/ directory contains package list information downloaded from your configured repositories. These lists tell APT what packages are available, their versions, and their dependencies.
When you delete the contents of this directory and run apt update, you’re forcing APT to re-download all package list information from scratch. This creates a completely fresh package database.
Critical Understanding
Your installed packages and data remain completely safe. This command only affects:
- Package availability lists
- Repository metadata
- Version information cache
It does NOT affect:
- Installed packages
- System files
- User data
- Configuration files
Think of it as reformatting your package manager’s “phonebook” – you’re not uninstalling anything, just rebuilding the directory of what’s available.
When to Use This Solution
Use this nuclear approach when:
- The previous two solutions haven’t resolved the issue
- You see repository or GPG key errors
- Package lists appear corrupted beyond simple cleaning
- You’ve manually edited repository sources and need a fresh start
- Error messages mention
/var/lib/apt/lists/specifically


Leave a Comment